Our Location
304 North Cardinal St.
Dorchester Center, MA 02124

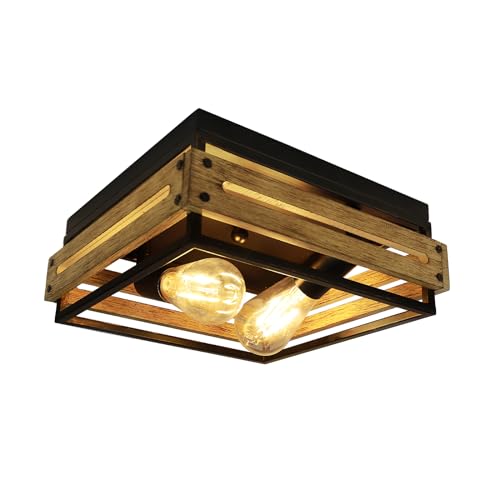
In this step-by-step guide, we will show you how to create a DIY farmhouse-inspired chandelier. This trendy lighting option is a great way to add a unique touch to your home decor.
To gather all the materials you will need for this project, start by finding a sturdy wooden plank. You can visit a local hardware store or repurpose an old wooden board that you may already have. Make sure it is long enough to accommodate the number of mason jars you want to hang.
Next, get some mason jars. These can be easily found at home improvement stores, craft stores, or even online. Depending on your preference, you can choose jars of different sizes or stick with a uniform size for a more cohesive look.
You will also need light sockets, which can be purchased at hardware stores or online. Make sure they are compatible with the size of your mason jar openings. Additionally, you’ll need electrical wire to connect the sockets to a power source. You can find this at a hardware store, and it’s usually sold by the foot.
To attach the wooden plank to the ceiling, you’ll need screws. Make sure they are long enough to securely hold the weight of the chandelier. Finally, you’ll need a chain for hanging the chandelier. This can be found at a hardware store, and the length will depend on how low you want the chandelier to hang.
Remember, these are just examples of the materials you may need for a DIY mason jar chandelier. Depending on your design, you may require additional items such as paint, hooks, or decorative elements. It’s always a good idea to plan ahead and make a list of everything you need before starting the project.
To prepare the wooden plank for your chandelier, start by sanding it down to create a smooth surface. Grab a piece of sandpaper and begin rubbing it back and forth along the plank, applying even pressure. Make sure to sand the entire surface, including the edges, until you achieve a consistent texture.
Once the plank is sanded, it’s time to add the finishing touch. Decide whether you want to stain or paint the wood to match your desired aesthetic. If you choose to stain it, select a wood stain color that complements your overall decor. Apply the stain evenly using a brush or cloth, following the manufacturer’s instructions.
If painting is your preference, choose a paint color that suits your style. Apply a coat of primer first to help the paint adhere better, then use a brush or roller to apply the paint evenly over the entire plank. Allow the paint or stain to dry completely before moving on to the next step.
Remember, the wooden plank will serve as the base for your chandelier, so take your time to ensure a smooth and beautiful finish.
To attach the light sockets, start by gathering the necessary materials: screws and a wooden plank. Place the wooden plank on a flat surface and determine the positions where you want the light sockets to be.
Now, take one light socket and position it on the wooden plank, aligning it with one of the desired spots. Using a screwdriver, insert a screw through the mounting hole on the light socket and into the wooden plank. Make sure the screw goes in straight and secure it tightly. Repeat this process for each light socket, evenly spacing them across the wooden plank.
As you attach each light socket, double-check that they are securely fastened and in the positions you want them to be. This will ensure that the sockets are stable and will not come loose later on. Once all the light sockets are attached, you can proceed with the next steps in your project.
Remember, taking your time and ensuring each socket is securely fastened will result in a well-built and durable setup.
Now, let’s move on to wiring the light sockets. Start by connecting the electrical wire to each socket, and make sure to follow the appropriate wiring instructions. Begin by stripping the insulation off the end of the wire, exposing the bare copper conductors. Then, locate the terminal screws on each socket. Insert the stripped end of the wire into the appropriate terminal, making sure to match the color coding (usually black to black and white to white).
Once the wire is inserted, tighten the terminal screws firmly to secure the connection. It’s important to ensure that the connections are tight and secure to avoid any potential electrical hazards or intermittent lighting. Double-check that the wire is properly seated in the terminal before moving on to the next socket.
Repeat this process for each light socket, making sure to connect all the wires according to the wiring instructions. Take your time and be meticulous in your work to guarantee a safe and reliable electrical connection. Once all the connections are made, you can proceed to the next step in your lighting project.
Remember, safety is paramount when working with electrical wiring. If you’re unsure about any step or lack experience in this area, it’s always recommended to consult a professional electrician.
To prepare the mason jars for your project, start by removing the lids. This will allow you to easily attach them to the light sockets later on. Once the lids are off, you have a few options to customize the jars according to your preference.
One option is to paint the jars in any color you like. This can add a fun and vibrant touch to your project. You can use acrylic paint or spray paint for this step. Another option is to add embellishments such as ribbons, twine, or stickers to the jars. This will give them a personalized and decorative look.
If you prefer a more rustic appearance, you can leave the mason jars as they are. The clear glass will create a simple and natural aesthetic.
Once you have decided on the look you want, it’s time to attach the mason jars to the light sockets. Make sure the jars are clean and dry before proceeding. Use a strong adhesive or a clamp to secure the jars in place. This will ensure they stay firmly attached to the sockets.
Remember to be careful when handling the jars and the light sockets. Take necessary precautions to avoid any accidents or injuries. With these easy steps, you’ll have your mason jars ready to illuminate your space in no time!
To hang the chandelier, follow these simple steps:
By following these steps, you’ll be able to securely attach the chain to the wooden plank, find a suitable location, and carefully install your farmhouse-inspired chandelier. Enjoy the warm and inviting atmosphere it brings to your space!
Double-check all connections and securely fasten everything before turning on the power. Ensure that the chandelier is properly installed and all wires are tightly connected. Now, it’s time to bask in the warm glow of your new chandelier. Flip the switch and let the lights illuminate the room, transforming it into a cozy haven. Sit back, relax, and enjoy the tranquil ambiance it creates. Let the soothing light wash over you, creating a serene atmosphere for you to unwind and appreciate the beauty of your space.
In conclusion, we hope that our blog post on how to create a DIY farmhouse-inspired chandelier has been helpful and inspiring. We believe that anyone can take on this project with confidence and creativity. So go ahead and give it a try! Remember to have fun with the process and enjoy the satisfaction of creating a stunning piece of decor that reflects your personal style. Happy crafting!


I followed the guide step by step, but I’m having trouble with the wiring. The lights don’t turn on when I connect them. Any suggestions on what could be the issue?
I’m sorry to hear that you’re having trouble with the wiring. It could be a wiring connection issue or a problem with the light sockets. I would recommend double-checking all the connections and ensuring the wires are properly secured. If the issue persists, it might be helpful to consult an electrician for assistance.
While I appreciate the farmhouse-inspired design, I’m wondering if there are any alternative materials that can be used instead of wood. I’m not very skilled in woodworking and would love to explore other options.
That’s a valid concern. If you’re not comfortable with woodworking, you can consider using reclaimed metal or even repurposing an old ladder as the base for the chandelier. It will still provide a farmhouse-inspired look while requiring less woodworking skills.
I love the idea of using mason jars as shades for the lights. It gives the chandelier a rustic and charming touch. I’m definitely going to try this project!
I’m glad you like the idea of using mason jars! They indeed add a rustic and charming element to the chandelier. Good luck with your project!
I tried making this chandelier and it turned out amazing! One tip I would suggest is to choose Edison-style light bulbs for a more vintage farmhouse look. It really adds to the overall aesthetic of the chandelier.
This guide was so easy to follow, and the end result is stunning! I hung the chandelier in my dining room, and it has completely transformed the space. Thank you for sharing this wonderful DIY project!
You’re very welcome! I’m thrilled to hear that the guide was easy to follow and that the chandelier has transformed your dining room. It’s always rewarding to see the end result. Enjoy your beautifully lit space!
Thank you for sharing your experience! Using Edison-style light bulbs is a great suggestion to enhance the vintage farmhouse look. I’m glad your chandelier turned out amazing!